7 January 2020 - 23 February 2020 ( week 3 - week 7 )
Ahmed Baahy Suhail (0333925)
Information Design
Project 1 & 2
LECTURES
Lecture 04: Chunking
17 January 2020 (week 03)
My group and I presented on Miller's law of Chunking, which portrays how information can be broken down into chunks so that humans can process and remember information faster and much more efficiently. Our findings are in the slides above.
Flip 4 & 5
Our task was to make a presentation on all the different types of inforgraphics that exist. We found 9 different types which are timeline, information, charts, process, resume, how to, comparison, pie chart, and number. After researching, we were each had to choose a type of inforgraph of our choice and recreate it using an online tool.
I chose the type "comparison" for Flip 5 and used Venggage to recreate the chosen inforgraphic.
INSTRUCTIONS
PROJECT 1 - Recipe Inforgraphic
Project 1- Recipe Inforgraphic
For our first project, we had to create an A3 inforgraphic poster portraying the process of any food of our choice. Since recipes are often lengthy and full on information, our lecturers challenged us to minimize all the information and visually communicate the process without writing too much, or if possible, no sentences at all.
I first thought about what type of food I wanted to base my inforgraphic on and took the time during the first week or two of this project to narrow down my options. I knew I wanted to visualize a Maldivian dish and eventually found the perfect food to work with. I chose Masroshi, which directly translates to Tuna Roti. Tuna is a staple food in the Maldives hence I just had to pick a dish that included it. Masroshi is a traditional short-eat which is served for breakfast or eaten in the afternoon or evening tea. It is commonly paired with a hot cup of tea.
 |
| Masroshi |
 |
| Masroshi |
 |
| Recipe for Masroshi |
After choosing my dish, I searched for inspiration to help me create a minimal but straight forward layout which communicates the process effectively. After browsing for some time, I stumbled upon Sung Hwan Jang's work.
 |
| Inspiration for Project 1 - Sung Hwan Jang Inforgraphics |
I really liked how they categorized the ingredients, process and main steps in their recipe inforgraphic and hence chose this approach for my poster as it is direct, straightforward and organized. I was also enticed by the center elements in their work and had to think about how I can incorporate my recipe into steps in such a manner.
 |
| Inspiration for layout |
 |
| Inspiration for layout |
The most challenging part was trying to visualize the recipe I chose and create a similar layout like the ones above. I had to go back to the recipe and deconstruct it to find all the important steps.
 |
| Writing down recipe |
I then proceeded to visualize the main steps I identified from the recipe and made numerous sketches. It took quite a bit of time since it was challenging to communicate all the information with such a minimal approach.
 |
| Sketching out main steps |
 |
| Figuring out the right order of steps |
Eventually, I managed to sketch out a recipe which made sense and had all the information required.
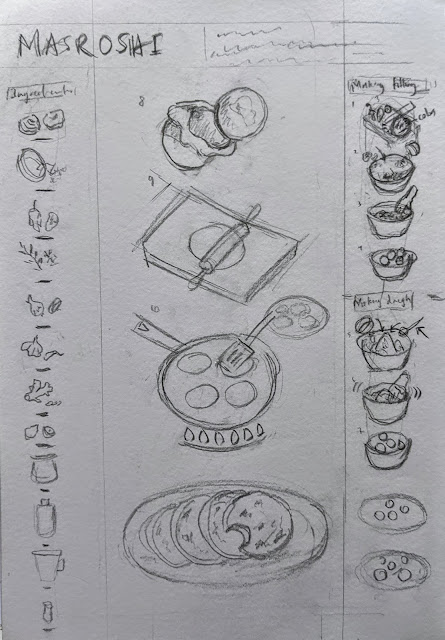 |
| Final sketch |
I then went on to Illustrator to draw out my content. I wanted everything from the ingredients, process and final steps to be self explanatory so it was crucial that my illustrations made sense.
 |
| Outline of ingredients and utensils |
After I outlined the content, it was time to color in. I went for a slightly dull tone tone for my illustrations, not too saturated.
 |
| Coloring in ingredients and utensils |
I also had to slice up the ingredients that needed to be cut and add in all the elements to their respective bowls. I also created spoons and added the oil, hot water and salt onto them. I also created the final Masroshi dish as well.
 |
| Slicing up ingredients, adding to process and creating main dish |
After I had all my visual content I put them onto a separate artboard so that it was easier for me to start forming it into the desired layout.
 |
| All the illustrated items |
 |
| Final layout |
After the layout was complete, I went on to experimentation to see which background would complement my content the best. For the title of my poster, I used a font I created in my previous sem,which is inspired by Maldivian culture and since this was based on something Maldivian, I just had to use it.
 |
| Font and color experimentation |
Since the poster seemed to look a little bit basic due to the blank background, I thought of adding textures and gradients to see if that would improve the outcome.
 |
| Experimenting with texture |
 |
| Experimenting with gradient |
 |
| Experimenting with color |
 |
| Draft 1 |
Blue tones worked better with this recipe in my opinion, hence I was satisfied with the color above. However, I added a breadcrumb like texture to the background so that it does not feel too blank.
 |
| Before & after texture |
Here is the final JPEG outcome of my A3 inforgraphic poster.
 |
| Final JPEG outcome of Project 1 |
Final PDF of Project 1
PROJECT 2 - Animated Recipe Inforgraphic
For our project 2, we are to animate our poster into either a tutorial video or a loop/gif. I went for the loop/gif as I am more comfortable with that approach since I have already made loops using frame animation before. I knew it was a lot of work as I had to individually move everything frame by frame and since they all have different movements, it was quite challenging.
 |
| 57 frames made for animation |
This was the first draft. I was not too satisfied with the outcome as it was still laggy and not as smooth as I would have liked. Also, it goes by really quick too and timing can be much better.
 |
| Initial Outcome |
I went to Illustrator and made more frames to make the animation flow better and not feel rushed.
 |
| Process of adding more frames |
 |
| Process of adding more frames |
 |
| Process of adding more frames |
 |
| Process of adding more frames |
 |
| Process of adding more frames |
For the draft gif, I used 57 frames altogether to make the animation. After fixing the errors, there are now 83 frames.
 |
| 83 frames made for animation |
I then exported all the frames into Photoshop to create a frame by frame animation loop.
 |
| Frame by frame animation in Photoshop |
Here is the final outcome of my Project 2. I am quite satisfied with how it turned out.
 |
| Final Outcome of Project 2 |


Comments
Post a Comment